ClearView Goggle Receiver Update and Upgrade Instructions
Copyright 2018 Iftron Technologies, Inc.
For Use With Firmware Update and Web Distribution
Introduction:
ClearView FatShark tm Goggle Receivers can be updated to the latest operating system using our Future-Proofing Type 2 (FPC-02) cable and an internet connected Windows PC. When your receiver is connected to your PC as per the instructions below, our Updater software will read the version number of your present software and automatically determine what updates and upgrades are correct for you.
Note: If you were expecting an update that you do not see, or no update choices are found, please send a copy of your present version number found at the top of the Status Screen – (push and hold from live video) to us at: clearview@iftrontech.com and request it.
Start Here:
Please check that your ClearView Goggle Receiver Pin #4 has already been clipped off as in this picture. If not, it will be necessary to clip the pin before proceeding. Please carefully identify and mark the correct pin before cutting. Then cut this pin as close to the base as possible so that it can not connect when the module is plugged back in. Note: Cutting this pin will not harm or change the operation of the goggles or receiver except for enabling updates.

Before you begin, you will need the following:
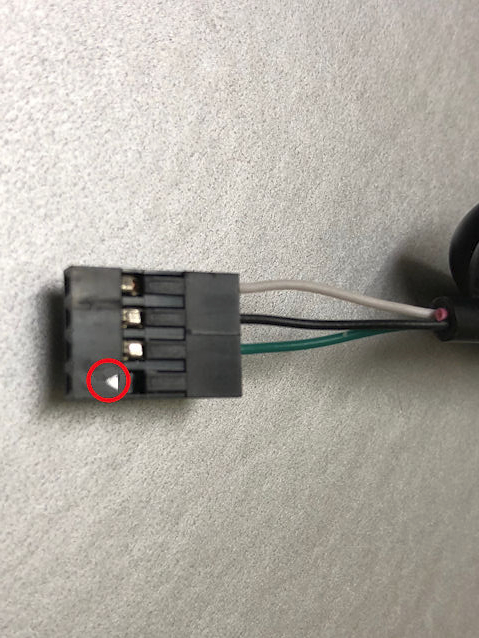
- Iftron Future-Proofing Cable Type 2 as seen below:
- A Windows PC with operating systems XP through Windows 10 with a known reliable USB port and if using a laptop, a power source good for at least 15 minutes.
- A battery or reliable power source for your ClearView Goggle Receiver, good for at least 15 minutes.
Instructions:
Please read through and understand these instructions before actually doing an update, or the receiver could be rendered inoperable until returned to Iftron for reprogramming.
- Obtain the driver files for the Future Proofing (FP) USB cable: Future-Proofing Cable Driver
- Install the drivers for the FP USB cable by running the file. Grant administrative permissions as required.
- Uninstall any previous Firmware Updater versions you may have on your PC. To insure that you are running the latest Firmware Updater, please uninstall any previous versions that are on your computer. (use the Windows ‘Control Panel’ or ‘Settings’ area and select ‘Add or Remove Software’ or ‘Programs and Features’ or ‘apps and features’ depending upon your windows version to remove older copies of the FWUpdater program).
- Obtain the latest FWUpdater file provided by Iftron. The most recent version of this program
can be downloaded from: ClearView Firmware Updater
- Install the FWupdater program by running the self extracting installer. Grant administrative permissions as required.
- Run the FWUpdater program, which should be found in the FWupdater program group of the Windows Start Menu. If asked, grant administrative permission to the FWUpdater program.
- When the program starts, it will ask you to ‘Connect to a Device.’
- Plug one end of your FP cable into an available USB port on your computer. DO NOT plug into your receiver yet.
- Wait until the computer finds and loads the proper USB driver.
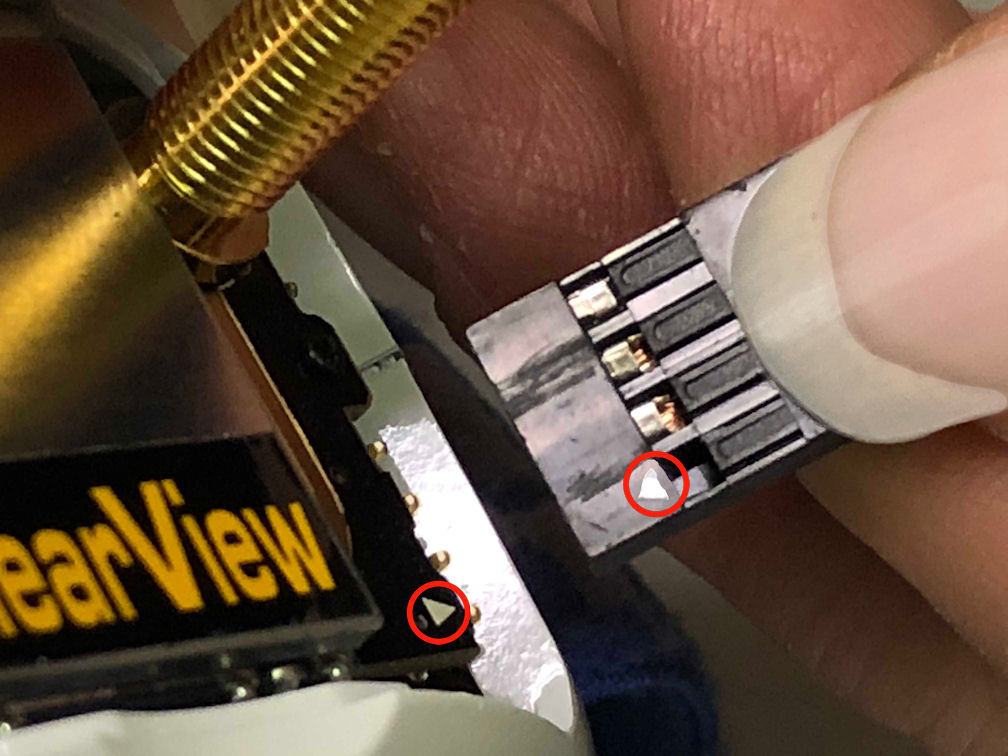
- With your RECEIVER TURNED OFF, plug the other end into your receiver using the correct polarity as shown.
Note: Press the connector all the way onto the pins. Make sure it is firmly connected. Avoid pulling on the connector after insertion. It must remain firmly connected for the remainder of the procedure.
- Now turn on your goggle receiver being sure you do not disturb the connector. MAKE SURE YOU HAVE ENOUGH BATTERY POWER FOR 15 MINUTES OF OPERATION!
- The “Connect…” box should disappear and a confirmation box should pop up saying, “Found Product.” Click ‘YES’ to confirm this is the product you want to update. Note that Clearview Goggle Receiver ID is: 00000013
- An information box then pops up confirming the connection but indicating that no update image has been loaded. Click OK then click on the blinking box titled ‘Discover Current Versions.’
Note: If you have already downloaded the update image you want to your PC, you may skip this step and go straight to step 10.
- After clicking the ‘Discover’ button, your browser will open to a page that shows all available update options for your connected product. Note: If you are participating in a test program with Iftron, you will have a testing code that you can enter for an expanded list of test images.
- Locate and choose the update image file you want to use. Files are categorized by
- Updates
- Reversions (Back to previous version)
- Purchased Upgrades (Extra cost feature upgrade)
- Test Updates (Beta Test Software)
Most likely you will want an image file from the Updates category. You can also use the Reversion images to return to a previous version if you don’t like or have problems with an update. Click on the link for the update you want. A page pops up. Right click the file link and click ‘save link as’ browse to where you want the image to be stored on your computer. e.g Documents, Downloads or Desktop. If you are upgrading with add-ons, you will most likely find your update image in the ‘Purchased Upgrades’ category.
- Return to your FWUpdater program, which is still running. Click the blinking ‘Browse’ button. Browse to the file you previously downloaded. The file will end in “.PSU.”
As an example: “FWPSU_Iftron_CVG5-8_SDRcvrModule_1.02A_to_1.03A.psu”
- Once the file is loaded, an info screen will confirm that the new file matches your product. Click OK.
- Important: Close all other software and disconnect from the internet before continuing. Other programs or processes such as virus scans, email, etc. that might distract your PC during the update process should be avoided.
- Now click the blinking “Begin Update Process” button found in the lower right of the program window.
- The update process takes approx. 9 mins or less. The progress window will periodically display status.
Note: Do Not Remove Power Or Interrupt The Update Process!
Note: Do Not Multitask Your PC During The Update Process!
The update is finished when the progress window displays “Update Complete. It is safe to remove or power down the device.”
- Close the program, restart your receiver and all should be good.
This completes the installation and activation of your update and upgrade.
Found a bug? Got an idea? Have a question? Please email us at: clearview@iftrontech.com
Link to this document:
https://docs.google.com/document/d/e/2PACX-1vQmgp6mKKRiMLULOGAvkEZCs6B6Rql_sNcRV5Ei5aeL2NXlIMZuuFxRL_td8hT4AYnIpaPPkzjeACM8/pub