ClearView™
Digitally Enhanced Racing Receiver™
Patents Pending

Quick Start Manual
Copyright 2017, Iftron Technologies, Inc.
May 1, 2017
Rev:11/18
Introduction:
This is a web enabled manual that will be added to as new information becomes available. Please check back frequently with the online version for possible changes and updates.
The ClearView Racing receiver provides much better video than conventional receivers, even in the most difficult environments. Here are a few ways in which the receiver operates differently from conventional receivers:
- ClearView (CV) is the only receiver that provides an On Screen Display (OSD) over live video. This is your assurance that CV has locked onto the video signal. No OSD from ClearView = No CV lock.
- Getting a CV lock may take a few seconds. Until this time, there will be no CV OSD over live video. Instead, ClearView will emulate a high quality diversity receiver. If in a rare instance, CV can not lock or persistently unlocks, there may be an issue with the camera, transmitter, or power supply and wiring.
- CV needs to know whether the video transmission is formatted as NTSC or PAL. If this setting is improper, ClearView will not lock. An AUTO mode is available in the user menu that allows ClearView to decide for you. AUTO is ideal when ClearView is used as a ground station servicing many pilots with unknown video standards. This setting can be made by the user (see Changing The Video Format).
- ClearView Racing receivers lock onto the camera signal. A power interruption (even a short one) at the camera may disrupt this lock and ClearView may take a few seconds to establish a new lock. During this time, the receiver will display conventional video. Thus for the best performance, it is important that the camera power connection be solid and reliable.
- ClearView Racing receivers provide better rejection to interference from strong and nearby transmitters on adjacent channels by stubbornly refusing to break lock with your signal for a time period of 5 seconds, regardless of how much of the interfering signal can be seen on your display. After 5 seconds, the interfering signal will have usually passed.
Important: Before You Start…
Cables:
As of August 20, 2018 Iftron will no longer ship the popular “camcorder” wiring standard. Instead, we will supply a 2 meter cable that plugs directly into FatShark goggles and compatible display devices. All units with this later wiring will have an advisory label affixed to the case bottom. Please consult us if you need a different wiring standard. Please note that the FatShark standard does not work with the more common 3.5mm to 3 RCA cables that conform to the camcorder standard. FatShark does sell a compatible 3 RCA cable.
Power:
Power the ClearView receiver from a DC source of 3 to 4 LiPo cells using a standard 2.1mm DC power jack (center + ), from any DC source capable of .5A or more from 9 to 16VDC. ClearView draws about .3A at 12V. There are some 2.1mm DC power jacks that have a larger center hole, so be careful using other 2.1mm DC plugs. The supplied power cable has the correct diameter.
Antennas:
ClearView antenna connectors are standard female SMA. Contrary to what you may have heard, you may run ClearView with two different types of antennas on each antenna connector (asymmetrical setup). However ClearView is not a diversity receiver and does the best noise rejection when both antennas are the same type. ClearView works with both omni and directional antennas. If you are using directional antennas, we suggest that you point them in the same direction. If you are racing or doing any other type of short to medium range flying, asymmetrical antenna setups will not be necessary and may work against you. However the performance of ClearView, even with different antennas, is still far superior to any other video system. We suggest that you experiment.
Pushbutton:
It is important to understand how the pushbutton is used to make changes and see information in the menu system. This is easy to learn. In general, a short press goes to the next choice, while the long press selects the present choice. Here are all the ways the pushbutton is used:
- If you apply power without pressing the button, the receiver will boot up automatically to the last used frequency.
- Changing The Video Format At Startup: ClearView ships in the AUTO video format mode. Thus, regardless of your camera’s video format, ClearView should work for you without adjustment. However, for those that wish to set the format manually: holding the button while power is applied and continuing to hold it, shows a special screen in your OSD for the purpose of changing the video format from NTSC to PAL and back. If your top line of text displays the correct format (NTSC or PAL) while holding the button, release it to continue the startup without changing. If it does not look correct, or if you know that you need to change the format, continue holding the button and the format will change to the alternate type and take you to a screen where you may choose between NTSC and PAL with short button presses. When the correct choice is highlighted, long press the button to choose the highlighted format. The last format will be remembered until changed again. Note: the video format can also be changed in the SETUP menu. (See Below).
- Quick Info Screen: After boot up, press the button for a short period to quickly check important receiver information. The information will consist of the ClearView logo, the present frequency, the number of lipo cells detected and voltage and other important data. Note that if the voltage is low for that cell count, a “LOW BATT” alarm will alternately flash. Note also that although the battery voltage will not normally be displayed on Live video, a LOW BATT alarm will be displayed on live video.
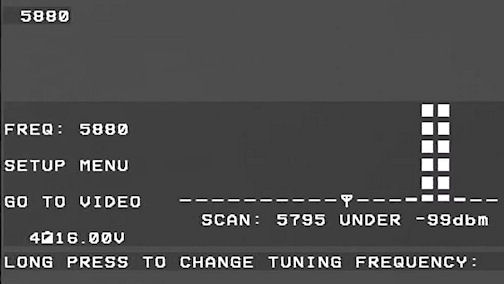
- Scan Mode: a long press from live video will allow you to select “SCAN” mode where live video for each enabled frequency can be selected with a short press. We strongly suggest that your video mode be set to AUTO so that video from all found transmissions can be seen. While in SCAN mode, a long press allows you to exit the SCAN mode while staying on the presently selected channel. Future updates may automatically send the receiver to AUTO mode during SCAN operation.
- Main Menu: To enter the main menu from live video, press the button 2 times quickly. In the main menu, you can change your frequency, go to the STARTUP MENU, and view the optional spectrum analyzer.
- Here’s the important stuff: Throughout the menu…
- A short press changes to the next choice or next item.
- A long press accepts and enters the presently highlighted choice.
- Always observe the “tip” line at the bottom of the menu.
Changing the receiver frequency:
- From live video, enter the main menu with 2 short presses.
- Notice that you are already on the “RETURN TO VIDEO” choice. We did this incase you got here by mistake. To instantly return to live video, long press the button.
- Short press the button until the present frequency is highlighted. (Note that the Spectrum Analyzer starts to run. This feature shows you what other channels are in use and how strong the signals are
- To tune to another frequency, highlight the frequency and then long press to change frequency. This cycles between all your programmed frequencies. As shipped, the receiver is set to the 8 race band frequencies, but these are easily changed in the SETUP MENU.
- Alternately, you may find it more convenient to go from live video to SCAN mode with a single long button press. Then continue short presses until you find the channel you are looking for and long press to tune to it.
SETUP MENU Items:
- Change seat number (For ClearNet use only)
- Change and edit up to 8 frequencies that you can tune to
- Change OSD from Clearview Logo plus Frequency to only Clearview Logo.
- Change OSD Position on the live video from 6 positions
- Change Video Format Between AUTO, NTSC & PAL
- Activation for software updates and upgrades
Seat Number: If using the receivers for a race with organized seating, the seat number of the receiver can be changed here, but is only visible in the setup screen.
OSD Content and Position: The SETUP MENU allows you to change the OSD content, and the OSD position on the live video screen. The OSD will move around the gray screen as you change it as a preview of the result without having to return to live video with CV lock. Experiment and see what works best for your needs. Moving the position is often a good idea if your transmitter has an OSD of its own and you want to avoid overwriting one OSD with the other. When using a multi-screen display for spectators, placing the OSD in the same position on all receivers, makes a more professional presentation.
Note: the OSD can never be set to “off” because when the OSD is present over live video, it tells you that ClearView is locked. A live video screen without at least the CV logo means that ClearView is not locked to the signal.
Editing stored frequencies: Although the receiver’s factory default channels are for race band, you may change any number of them to accommodate your transmitter channels or race rules. Short press to scroll through the channels, and long press to change the frequency. Long press to select and change the highlighted digit, or short press to move to the next changeable digit. Once a digit is selected with a long press and is highlighted, continue to short press to change the number until you arrive at the one you want, then long press to accept and move on. When satisfied with your choices, long press on the “OK” sign to finalize your choices. (This may seem a bit awkward at first, but a little practice and it will become second nature to you). Try it a few times!
Tip: placing an “X” in a frequency disables it. Thus, if you are using less than 8 channels, you will not have to scroll through all the channels you do not use.
Here is a frequency table for your reference. Please note that all ClearView receivers are nowLOW BAND enabled. And all software updates for earlier additions will also enable low band:
|
1 |
2 |
3 |
4 |
5 |
6 |
7 |
8 |
|
|
Raceband |
5658 |
5695 |
5732 |
5769 |
5806 |
5843 |
5880* |
5917* |
|
Fatshark/IRC |
5740 |
5760 |
5780 |
5800 |
5820 |
5840 |
5860 |
5880* |
|
Bosscam A |
5865* |
5845 |
5825 |
5805 |
5785 |
5765 |
5745 |
5725 |
|
Bosscam B |
5733 |
5752 |
5770 |
5790 |
5809 |
5828 |
5847 |
5866 |
|
Bosscam E |
5705 |
5685 |
5665 |
5645** |
5885* |
5905* |
5925* |
5945** |
(*) Note: It is illegal to transmit on these frequencies in ITU regions 1 and 3
(**) It is illegal to transmit on these frequencies in ALL ITU regions
It is legal to receive on all frequencies.
ITU Region 1: Europe and Africa
ITU Region 3: Asia, Australia, New Zealand
ITU Region 2: North and South America
ITU World Map: http://www.mapability.com/ei8ic/maps/regions.php
Other items may be added to the SETUP screen menu when updates or upgrades are made to the receiver.
Software Updating: If you have our Future Proofing cable and an internet connected Windows PC, you can update your software yourself. Please go these Update Instructions for complete information.
A Final Word:

Don’t be afraid to explore and change things in the menu. You will not damage anything, so have fun. If you get lost or confused, feel free to pull the plug and start over. Most of the changes you have made will be remembered.
We value your opinion! Want to make a suggestion or offer a criticism of this document or the receiver itself? We would love to hear from you! Please send us an email to: clearview@iftrontech.com
URL for this document:
https://docs.google.com/document/d/1aoXOix6aDCG99Dj6SfIQXi62ODwwV0aPXablfnLzWMg/pub